
4.4 KiB
MicroPython Sensor Alarm
Table of Contents
Overview
This project utilizes a magnetic (Reed) switch to flash a group of Philips Hue lights and/or send an email
The script is designed to go into deepsleep so that it could be utilized on battery power. It wakes up from the magnetic switch movement, causing the alarm to trigger
This is one of the my first micropython projects so I combined a lot of things, like Philips Hue and emails together unnecessary. Should have considered modules for each instead.
Credits
Parts
| Part | Cost | Quantity | Total |
|---|---|---|---|
| Magnetic Switch | 8.98 | 1 | 8.98 |
| Project Box | 6.51 | 1 | 6.51 |
| A ESP32 Controller (I used Wemos LOLIN D32) | 6.50 | 1 | 6.51 |
| Momentary switch | 1 |
Magnetic Switch - Setup
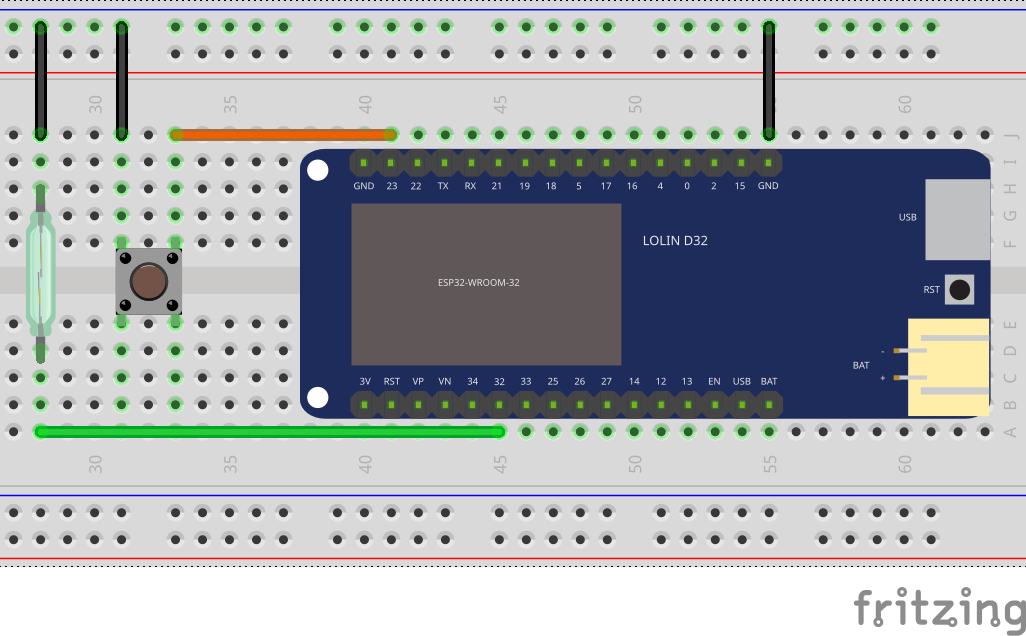
- Note 1: Above schematic has the magentic switch connected at pin 32. This should work although I actually use 16
- Note 2: 10kΩ Pull-up Resistor
GPIO16 has a pull-up resistor that can be enabled. No need for an external resistor.
I noticed that the board would not boot if the magnetic switch was connect to GPIO0. It would only work if I connected the switch after the boot. Using GPIO16 seems to get around this.
from machine import Pin
p0 = Pin(16, Pin.IN, Pin.PULL_UP)
Example Output
>>> from machine import Pin
>>> p0 = Pin(16, Pin.IN, Pin.PULL_UP)
>>> p0.value() # Open
1
>>> p0.value() # Closed
0
>>> p0.value() # Open
1
>>> p0.value() # Closed
0
Setup
- Modify config.py. Leave those features you don't want commented out (e.g. phue, smtp, button, etc):
config = {}
config["wifi_ssid"] = "MySSID"
config["wifi_pass"] = "Password"

config["sensor_pin"] = 4  # Sets Pin.PULL_UP
config["device_name"] = "Front Door Alarm" # Device sending alert

config["config_button"] = 23  # Pin containing stop/start button
config["config_led"] = 5  # Pin with LED

# Delete/Comment Out If Not Needed
config["phue"]["group"] = 3  # the light group to flash
config["phue"]["color1"] = (244, 0, 0)
config["phue"]["color2"] = (0, 0, 204)
config["phue"]["flash_count"] = 3

config["smtp"]["subject"] = "Front door open"
config["smtp"]["from"] = "<from_address>"
config["smtp"]["to"] = "<to_address>"
config["smtp"]["username"] = "<username>"
config["smtp"]["password"] = "<password>"
config["smtp"]["server"] = "smtp.gmail.com"
config["smtp"]["ssl"] = True
config["smtp"]["port"] = 465
- Upload the scripts
ampy --port /dev/ttyUSB0 put library/alarm.py
ampy --port /dev/ttyUSB0 put library/leds.py
ampy --port /dev/ttyUSB0 put library/uhue.py
ampy --port /dev/ttyUSB0 put library/umail.py
ampy --port /dev/ttyUSB0 put library/wifi.py
ampy --port /dev/ttyUSB0 put config.py
ampy --port /dev/ttyUSB0 put main.py
- If first run, you should connect over serial and open the switch. The script should ask for you to press the connect button on the bridge. Additionally, the
bridge.datfile can be backed up and saved for other sensors that might use them:
ampy --port /dev/ttyUSB0 get bridge.dat
which looks like the following:
["<bridge_ip>", "<api_username>"]